https://www.youtube.com/embed/3cQaqUVafKo In this video, you will learn how to programrealistic MIDI drums using a selection of simple and quick drum programming tips. So keep watching if you want to make yourtracks sound more natural and more professional. But first, be sure to download the free drumprogramming cheat sheet, there's a link in the bio or on screen now. In this video, you are going to learn threespecific techniques for making MIDI drums sound more realistic. The first one is making the performance morerealistic by using electronic kit or playing with the MIDI notes, varying the velocity,stuff like that.The second technique is making sure you choosethe right kit and the right samples. And then the third technique is making thedrum sound more realistic when it comes to mixing them. Now before I really go into how to choosethe right kit when you are using MIDI drums or program drums or EZdrummer, anything likethat, I want to make a couple of things clear. This video is about making MIDI drums andprogram drums sound real and realistic like it was played by a real drummer on a realdrum kit. So if you are working with electronic music,these tips won't necessarily apply to you. And if you prefer a natural sound and youlike to avoid program drums entirely, then of course that's totally fine but again thisvideo might not apply to you.However, if you are working in a home studioand you want a more professional sound, using MIDI drums and program drums is one of theeasiest ways to level up the quality of your work. So keep watching if you want to use thosekind of drums and make them sound realistic so you get the best of both worlds. So let's dive right in with technique numberone, which is making the performance sound more realistic. So, first of all, if you can't play drumsand you want to get a really realistic sound without having to worry about miking up anacoustic kit and all fuss that comes with that, then you can get an electronic drumkit. Use software like EZdrummer or Superior Drummer,there's loads out there and you can just play the part in on your electronic drum kit, soyou are going to get the realistic performance, the human like timing – well, human likeis a human playing the drum kit – and all of those benefits, but you are going to getthe sonic quality of the samples and the software itself.So that's a really quick and easy way to geta more realistic sound if you are a good drummer and then you can spend some time quantizingthose notes, moving stuff around if you want to. You can actually achieve similar results justby using a sample pad or even a keyboard to play in specific parts. So you could program in the kick and the cymbalsjust using loops or programming it manually, and then you could actually get your keyboard,find where the snare is, and just manually play in that one part. And you could do that with the kick too butjust manually doing the kick or the snare is going to give you that human element andthen you are not having to play a whole drum kit on the keyboard but you can get that timingright and then you can quantize and play it afterwards.Now the next option is that you can programin the drums on the beat so that it does sound a bit robotic. But then we can humanize them in a certainway by adjusting the timing and the velocity, that sort of stuff. So we could actually just get a empty bithere... Then we could find the kick... So I found the kick here on C1 and then wejust program in a simple beat. Then we can find the snare... And program that in too. And then we can find the hi-hat. And program that in on every beat. And there we go. We've got a basic drum beat that we manuallyprogrammed in. But it sounds very rigid, it sounds very robotic.So we can make this now more human by firstof all varying the velocity. Now, the exact process for this is going todepend on your DAW but in Logic I can turn on the tray here, go to velocity and now Ican vary these. So instead of just having the same, I can select one and let's say we want the hi-hat to be a bit softer, and wealso want it about there. And then on the second beat, on the off-beatwe will probably have it a bit softer, but then the kick we might still want to havethat harder. And same here. And you just need to follow the kind of usualpatterns that a drummer would use, so there's going to be more emphasis on the beat. So with the hi-hats, it's really importantto get this variation in the velocity. So every it will be hard,soft, hard, soft, hard, soft, hard, soft. And already it's starting to sound more realistic.So you can go into a lot of depth for this,but varying the velocity is a really easy way to make it sound more human. And then the next thing we can do is actuallyjust mess with the timing a little bit, so that it's very slightly off. So if we just zoom in and grab let's say thesehi-hats, and just pull them a tiny bit before, and if it helps, you can turn off snap sothat we can just pull these a tiny bit before or ahead of the beat. And if anything, we want to use the off-beats. Leave the on beats a bit more steady.And then we could do the same with the kickand the snare. You can just play around the velocity andthe timing to make it sound more realistic. Now that's quite an in-depth process there. That really takes some time, but if you wantto program in the drums manually this way, because you are working something, then that's honestly the best way to make it sound more human. There's more stuff you can do like addingin realistic flams, check that there's nothing impossible going on in the drums, so theyare not hitting three things at the same time and you can also vary between open and closehi-hats. You are just trying to make it more human. Just listen to a drummer and listen to howthey play and try and replicate that. Now the third way to make the performancemore realistic in my preferred method is to just use the loops that come with EZdrummer,whatever you are using, because often they've been programmed to sound really realisticor ready.There's lots of variation in the velocity,in the timing, that kind of stuff. And if you feel that loops don't really fitin with what you've already written and you struggle with that, then the solution thatI found was to make it part of the writing process. Quite early on, when I am sketching out ideasfor a song, I will start pulling in drum beats from EZdrummer and often that can take thesong or the bass part in a slightly different direction. So let's get rid of this and go back to thesong sketch that I've got going on, and we are just going to loop the section here andtry and find a loop in EZdrummer that sounds good with this. So first, let's have a listen to what we areworking with. So I am just sketching out ideas at the moment.You got a scratch vocal in here. I am trying out different stuff and this isthe point that I start experimenting with different loops to see where it takes thesong. So now we can just pull up EZdrummer and wecan even browse just trying out different things and seeing how they sound. Or we can actually search and again dependingon what software is used, the process here is going to vary, but you can search by tempoand fill. So you want to start experimenting with differentdrum loops and I've already gone through this process and found something that I like. So, let's go grab that. So this is the one that I found earlier. So then we can drag this in and we can startplaying around with it, and in EZdrummer I can start, maybe add a tambourine part, increasethe velocity on the snare to make it a bit more aggressive, if it's a chorus, that kindof stuff. So I find this is the best way to get a naturalrealistic sound by using those built-in loops and making it part of the writing process. So we've already spent a lot of time on thatfirst technique of getting the performance right, because this is really important. But now we are going to move onto the nextthing which is choosing the right kit. But first, make sure you grab that cheat sheet,because we've already covered a lot here and I've put together all of this informationinto a cheat sheet that you can use when your next writing or mixing to make sure you getreally realistic drum sounds.Okay, so how do you choose a realistic soundingkit? Well once you've got a loop that you are happyto move forward with, and you can always change that later, but you found something that wasgood enough for now, well, then you can start to play around with the different kit sounds. Now, depending on whether you are using samplesor drum program and software like EZdrummer, you just need to start listening to differentstuff in the context of the track to see which sounds most realistic. Now, I find myself using this kick quite oftenin EZdrummer and what you will find is with a lot of this software, the main kit thatcomes included, doesn't always sound the most realistic.Have a quick listen to this. So that sounds pretty good in this context. But you just want to start cycling throughthese and see how they sound. And what we are looking for here is just adrum kit that sounds right in the context of the track. It's not finding any of the other elementsfor too much space. You want to avoid that stereotypical programdrum sound if you are trying to get a realistic sound.And quite often, the basic kit that comeswith a lot of this drum programming software has that stereotypical sound to it. So I like to experiment with the other kits. So once you've done that, it's time to moveonto technique number three, which is mixing the drum kit to sound more realistic. Now, the first tip I have for you here isto mute the included reverb that comes within the drum software and use your own instead. So what you will see here if we go to themixer is that we have this reverb channel. And we also have these ambience channels too. So what I like to do is completely mute thereverb. And then I like to just blend in the ambienceand see if it's adding anything to the mix. So at this point of time, it sounds prettydry now that we've muted that reverb. But the reason I've done that is because whenI am mixing, I am probably going to use a general room reverb and I am going to usethat reverb on the guitars, the backend vocals, definitely the drum kit, the snare, any otherparts that I want to be a bit in the background, and sometimes even thelead vocal too. And by using a separate reverb, you are goingto have much more control and a more cohesive sound where the drum kit is going to soundlike it's in the same space as everything else. So now we could take this kit and just setup a bus as a send and we can start playing around with our own reverb that we want touse, instead the included one.So I can just pull up something like ChromaVerband start playing around with this. And now we have way more control, we can shapethis reverb and this is the same reverb bus, I'll call this reverb that I could use onthe guitars and everything else in the mix. Now, while we are on this topic, feel freeto mute any other channels that you don't feel are really adding anything, like I didthere with the ambient track, blended them in, but sometimes there are other tracks inhere that you might not necessarily want like maybe we don't need the kick in and the kickout, maybe we don't need a snare bottom for example. So feel free to mute or play around with thesewhile you are mixing. And of course, I'd also recommend that youfigure out how to get these onto channels in your DAW so that you can mix the kick andthe snare like you would a real kick drum or a real snare drum.You don't need to process any differently. They are already a bit mixed, they alreadysound good, but you still want to shape them so they sit right in the mix. And the exact process for that will vary fromsoftware to software but just figure out how you can get all of these channels into yourDAW so you can mix them like a normal drum channel. Then my next tip when it comes to mixing isto use a reference with a real drum kit and try and get a similar sound if you can. Focus on how much reverb is on the snare,how loud the cymbals are, what the tone of the kick drum is. You want to use a reference with a real drumkit if possible that's going to steer you in that direction because you are constantlycomparing your fake drums to a real drum kit, and that's just going to lead you in the rightway if you want that realistic sound.And then I've got two more quick tips whenit comes to mixing. The first one is to try using saturation onthe whole kit. So by now you should have exported this outto individual channels and you can create a drum bus. But I am just going to do it here quickly. And we can use saturation to add some characterand a bit more excitement on the top end. And that's going to get rid of that stereoslightly fake sound that sometimes this drum software can have. So what I am going to do here is just dialin some saturation on the top end. That just gives it a bit more excitement andthen finally you could also use some parallel compression, and the easiest way to do thisis to just use a compressor that has a mix knob on it, so that we can blend in the originalwith the compressed version. And we just want to apply heavy compressionand then blend in underneath.So first, we dial in the compression... And then we can use this mix knob to justtuck it in underneath and give the whole drum kit more energy. So you can use all of these techniques that you'd normally use on a real kit to give it moreexcitement and more energy. And by doing that, you are going to make thesedrums sound more realistic. You just approach mixing them in exactly thesame way you'd approach mixing an acoustic drum kit. So there you go. Three ways to program MIDI drums to soundmore realistic. Now, we covered a lot here, so I put togethera free cheat sheet that takes you through those three techniques and all of the tipsthat we've covered here so that next time you are writing a track with MIDI drums ormixing a MIDI drum kit, you can go through and remind yourself with these and apply them,give each of them a try, because the key here really is in the application.You need to go and practice this to see theresults, that's how you improve. So there's a link in the bio below or on screennow if you want to grab that, and it's completely free. And if you are new here, don't forget to subscribeand click the notification bell. So that's all for me, I will see you sametime next week, and remember, Create Regardless.. learn djembe here - click
https://howtoplaythedjembedrums.com/how-to-program-realistic-midi-drums-today/
Tuesday, 19 April 2022
Sunday, 3 April 2022
Famoudou Konate - The King of Djembe

https://www.youtube.com/embed/JfgCJBaFOfs
not efficiency in some effect the field trip you might assume apprentices pas je parle avec mon ami and their to the SE supone ready Porco the peace fair wikisource the lessee Dalma dome RG e latitude African Republic in Guinea Driessen Hamada a bank silver pesos and Tennessee come on don't call the puja eco family life a mean son of your own video that fantasize who confirmed luck with you absolutely present a certain ducal here place exact single center voyage don't want device it was it members a module is a monument in West African music in a West African tradition he is a monument one of the biggest biggest biggest baobab today so making the movie for him it mean Allah it's like bring the light on what he's doing on his legacy how to tell people about him this is wonderful person very humble persons you never met an earth family is the idol for all names is the past now we are family here we don't know what we're happy so before we think about all we don't see family anymore is it the best way to have a nice document the family photo family is a master drummer representative a from amana images homina homina not just image from Africa so is it best thing to make a nice statement for master master some will imagine the give me only me Sifu Kinsey a develop a logic applicant Sifu Tina said I've even happier standard
https://howtoplaythedjembedrums.com/famoudou-konate-the-king-of-djembe/
Zakir Hussain and Marcus Gilmore, Rolex Mentor and Protégé in Music, 2018–2019
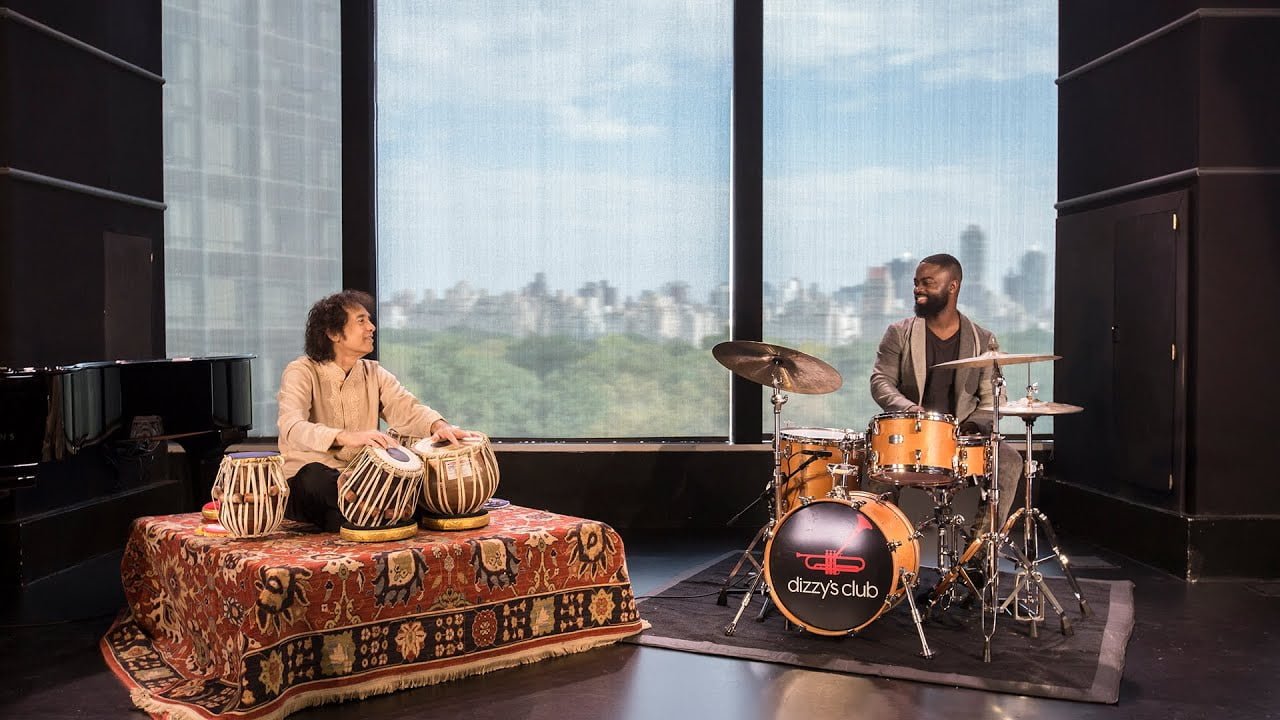
https://www.youtube.com/embed/6RsuVUB44rU
In the language of tabla there is a vocabulary, there’s a grammar, you learn all that and then you learn to put it together. I learnt everything that I know about drumming from my father. He was my guru and my master. My father told me once, “Go ahead and play with jazz, go ahead and play with rock, do whatever you want to do but don’t forget your roots, don’t forget where you came from, what your identity is because that’s what you bring to the table.” I’ve always had a really strong connection with music, and drums in particular. When I was fairly young I realised that this is what I wanted to dedicate my life to. This programme brings together different cultures and passing information down to the next generation means everything. I actually see it as an opportunity to straighten out some things in my career. Every rhythm cycle has its own particular rhythm riff which has a melodic tone. It’s about preservation of what was and bringing it into the present and making sure that it’s nurtured and passed on to others intact but at the same time, to not just keep it as it is but to open it up to see what else can be done with it.
Marcus has always wanted to compose but the confidence that you need to be able to sit a musician down and tell him or her exactly what you want done is something that does not come easily. There’s this whole composition that I’m writing for the orchestra and I’ve never written for a group of this size or this magnitude or this instrumentation so it’s actually very new territory for me.
I’m still figuring out my artistic process when it comes to composing. I think writing a rhythm concerto… He has experience writing in these types of situations. I looked at the orchestra as one big rhythm section. So he’s able to offer me his advice and show me the ropes. The experience in India was life-changing. I actually got to perform with him in Mumbai. To be involved to this degree and to be like one-on-one, it was amazing. What I’ve noticed is that his language of speaking rhythms has broadened. This need to want to know more and be able to take that leap of faith and take information, that’s something that has always guided great musicians and this is what’s happening with Marcus. I think it’s a beautiful initiative to be pairing up these younger individuals within these disciplines with living legends. It makes the world a more beautiful place to live in. It perpetuates the culture. Our goal in this last couple of years was to be able to take a talented, young, possible genius and bring him to a point where the hesitancy has gone and I think we have arrived at that point.
.
https://howtoplaythedjembedrums.com/zakir-hussain-and-marcus-gilmore-rolex-mentor-and-protege-in-music-2018-2019/
Creative Performance Techniques - Ableton Push 2 Tutorial - Unconventional Drum Sequencing Tricks
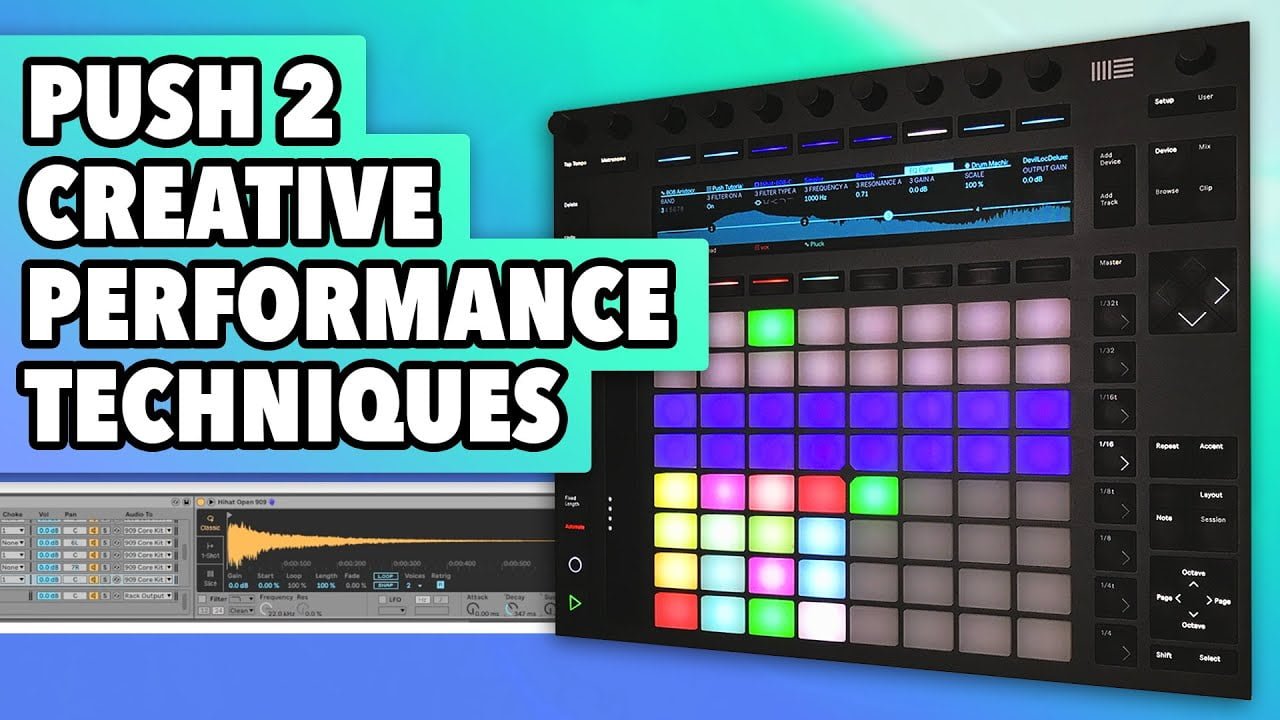
https://www.youtube.com/embed/Z8XU3HRSUgI
Push 2 - Creative Drum Performance Tricks Hey everybody!
In this Tutorial we will focus on Unconventional Techniques to use Push 2 as a performance-oriented drum machine I'll share 8 Tricks and other Tips that I think you'll find helpful if you own Push 2 and want to use it as a Performance Instrument Tried to organize infos in the best way possible.
You'll see Red text boxes, like this one, containing conceptual and introductory informations Then you'll find these Blue boxes, where I put technical infos about what I'm doing with my hands, and actions taken in Ableton Live Finally, I highlighted some Push buttons and areas where I thought it was needed Ok, let's start! Trick #1- Quick Pattern Switch This is the Drum Rack we'll use today The Most important Thing when performing with Drums is the ability to edit Non-Playing Patterns and switch to them while keeping full control of the Drum Kit Normally, to change between 2 drum Clips with Push 2, we would move to the Session View and Launch Clips, like in this example But today we'll see a method to include more Patterns in the same Clip, to quickly edit Non-Playing Patterns and to switch back and forth without leaving the Note View To do this we'll create a new empty Clip (in this case it is 2 bars long).
And then move to the Note View making sure we selected 16 steps resolution Ok, now we can split the 2 bars Clip in two separate 1 bar Patterns, and switch between them, using the Loop Selector on the right - Loop Selector - Pattern 2 - Pattern 1 If you can't see the Loop Selector just click the Layout button to rotate between the 3 different layouts Here we have 2 Patterns:
1 with Kick and Open Hat
2 with a Closed Hat added
Let's switch between them TRICK #2 - Progressive Arrangement Now, let's try to Sequence Drums in a performative way!
Keep in mind that we can only visualize 2 Patterns at a time on the 32 step note grid Creating Pattern 1:
Kick on the Downbeats
Open Hat on the Offbeats
Tip: use the Select button to choose kit elements We can use the Double Loop button to create Pattern 2.
Then use the Loop Selector to stay on Pattern 1 Playing Pattern 1 while adding a 16th note closed HiHat to Pattern 2
We can then switch to Pattern 2 Now, let's repeat in the second row.
We'll use the Duplicate button to copy Pattern 2 into Pattern 3, and then Double Loop to create Pattern 4 Playing Pattern 4 while editing Pattern 3, adding a Snare and a clap fill on the last two steps
Then switching to Pattern 3 Let's repeat one more time:
Duplicate Pattern 3 into Pattern 5, then use Double Loop to create Pattern 6 Playing Pattern 6 while editing Pattern 5, adding High, Mid and Low Toms
Then switching to Pattern 5 Here is how my Pattern grid looks like.
I did it this way to keep every varied Pattern (1, 2, 3, 5) at hand, to easily launch them.
I will need this later.
Patterns 4 and 6 served as a playing support while sequencing other Non-Playing Patterns TIP: the Clip View contains an overview of your created Patterns TRICK #3 - MUTE AND SOLO Would be very nice to make smoother Transitions between Patterns..
Let's try to use some Drum Kit parameters to do it! One of the most important things in electronic music is the Kick.
So we'll try to Mute and Unmute it to make Transitions Let's just mute the Kick using the Mute button, 1 bar before the Drop.
When ready we'll Unmute the Kick, changing Pattern at the same time Mute button + Kick pad
Mute button + Kick pad + Pattern Selector And you can use the Solo button in the same way!
On the HiHat for example Solo button + Closed Hat pad
Solo button + Closed Hat pad + Pattern Selector Can you see why I need Patterns at hand? ;) TRICK #3 - MACRO KNOBS Another nice element to create Movement with Drums is the Hats Decay So, let's Map both (Open and Closed) Hats Decay to first and second Macro Knobs Ok, now we can use this Decay to anticipate Transitions Let's try it along with the Mute Kick Trick! Raise Hats Decay
Mute Kick
Unmute Kick and Change Pattern
Decrease Hats Decay There are other Drum Parameters that you can Map to Macros to make Transitions.
Find 'em explained in the Tutorial up there. TRICK #5 - STEP ACCENT A Feature that i miss on Push 2 is the Step Accent. Basically a way to set velocity for the whole drum kit or parts of it, per step, without editing every single instrument It's a quick and easy way to add groove in busy Patterns. Like in this example To create the Step Accent, let's Map various instruments Volume to the same Macro knob.
I did it for both Hats, for all the Toms and for the Bass Ok now let's slightly rotate the Macro Knob to add Groove We can also record it as an Automation Yeah!
And it gets even better with a touch of Swing Rotate the Swing knob
then click Quantize to commit Love it! TRICK #6 - SNARE ROLLS We will now create some Snare Rolls to vary our Transitions.
So we'll sequence the Snare Roll and map its Volume to a Macro Knob, to gradually bring it in Sequencing a 16th Snare Roll
Gradually raising its Volume
Switching Pattern Nice!
Let's try it coupled with the Mute Kick Trick Gradually raise Snare Volume
Mute Kick
Unmute Kick/Switch Pattern We can even use the Note Repeat Feature to Play/Record our Snare Roll Recording Snare with Note Repeat
Gradually raising its Volume
Switching Pattern TRICK #7 - SAMPLE SWITCH ROLLS Ok, Snare Rolls are pretty standard...

But I included them because I wanted to show you this one! What's this??
Let's see! Basically what I'm doing here is switching the Snare Sample in real time, creating glitchy effects and fills.
Let's see how to set this up in Ableton Live First, we need our Snare to be in a Sampler device, not Simpler.
Because Sampler supports multi-layer samples Clicking on the Zone tab we'll open this window, where we can see our Snare sample Let's drag in a bunch of random Snare samples Now we can click on the "Sel" button, select all the samples, right-click and choose "Distribute Ranges Equally" Finally let's Map this little blue bar, the Sample Selector, to a Macro Knob Sequenced a 16th Snare Roll
Randomly tweaking Sample Selector and Snare Volume TRICK #8 - FULL ABLETON INTEGRATION How to integrate all these things into an Ableton Live full Project, with other instruments, scenes, ...? First, we need to organize the Performance into Scenes.
Here I have one with just the Drum Kit, another with a Pad, another with some Vocals and a Pluck Synth IMPORTANT: We'll always need just one Drum Clip, so we should remove the Stop Buttons for the Drum Track in every scene But we still need to focus on the Drum Rack, and we can't use Push to launch Scenes..
So? We can use any Midi controller with pads or buttons to Map the Scene Launch There are even free iPhone apps to do that I'll use my favorite: the wonderful Touchable iPad app.
It works on iPhone too, but it's not free. Now let's try all these Tricks in full context! Pattern 1: Sequencing Kick and Open Hat
Doubling to create Pattern 2 Pattern 1 Playing.
Sequencing 16th Closed Hat, Bass notes and an offbeat Stab
on Pattern 2 Increasing Hats Decay,
Muting Kick
Switching to Pattern 2/Unmuting Kick Duplicating and Doubling to create Patterns 3 and 4
Recording Step Accent Pattern 3 Playing.
Sequencing High, Mid and Low Toms on Pattern 4 Increasing Hats Decay,
Opening the Stab Filter
Muting Kick
Switching to Pattern 4/.... (Yes it was a mistake..)
Increasing Hats Decay to Unmute Kick Opening the Stab Filter
Increasing Hats Decay
Muting Kick
Launching Scene 2 Tweaking Hats Decay
and Stab Filter
Launching Scene 4 Increasing Vocals and Plucks Volume
Tweaking Hats Decay
Unmuting Kick Muting Ride Cymbal
Sequencing 16th Ride Cymbal
Muting Kick
Unmuting Kick and Ride Cymbal Sequencing 16th Snare Roll
Raising Snare Volume
Switching Snare Sample Switching Snare Sample
Tweaking Hats Decay
Switching to Pattern 2
Launching Scene 2 Don't forget to SUBSCRIBE if you liked and please let me know your feedback I hope you enjoyed this Tutorial.
Check out my Jams too, maybe you'll find some more useful ideas.
Take care! ;).
https://howtoplaythedjembedrums.com/creative-performance-techniques-ableton-push-2-tutorial-unconventional-drum-sequencing-tricks/
Djembe Repair: Knotting the Rings : Djembe Repair: Putting on the Bottom Ring
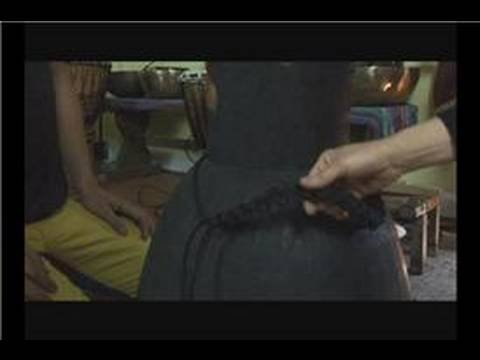
https://www.youtube.com/embed/9JXyQ8HP8i4
Okay, so now if you're going to be making
this drum, is..monster drum, so we're going to be having twenty six knots. We have twenty
six knots on the top ring, but the bottom ring, before we put it on, we're only going
to do twenty five. When you put the ring....but we're going to leave it nice and loose for
now, and you'll see in a minute, make sure that you have...that you're rope is facing
this way. Like, the little bumps, facing towards your top ring. We're going to...see there's
two sides. You want it this side, facing out, these bumps facing up, and these ones here.
So, yep, so get ready, we're going to pull it. We're going to finish our last knot. So,
like I said, leave one knot without doing it, we're going to pull it tight, and then
you're going to finish that last knot on the drum..
https://howtoplaythedjembedrums.com/djembe-repair-knotting-the-rings-djembe-repair-putting-on-the-bottom-ring/
Subscribe to:
Posts (Atom)